Your site is great but I bet you can improve it with some extra styling. Let’s take a look at how to add custom CSS to WordPress using standard and alternative methods.
Every WordPress site has activated a theme; actually, this is one of the features that made WordPress so popular. The themes are made of PHP, CSS, and Javascript code, all combined with HTML. Premium themes can have a lot of extra goodies to help you build a site. You can add more functions by adding and activating extra plugins. However, the theme is more or less what the visitors see when they come into your site.
Why Add Custom CSS?
- because you need to make a change that is not supported by the theme
- you have discovered a design flaw you need to correct yourself
- you need to add style to a new element
Nice! But first, let’s keep a backup of the site because, in the process, you may go way further than you initially expected. In this case, you may not remember all changes you made at the beginning. Similarly, if you have heavily modified a theme you may need to keep the original files stored somewhere to review or even restore them on the installation.
Add Custom CSS on the Customizer
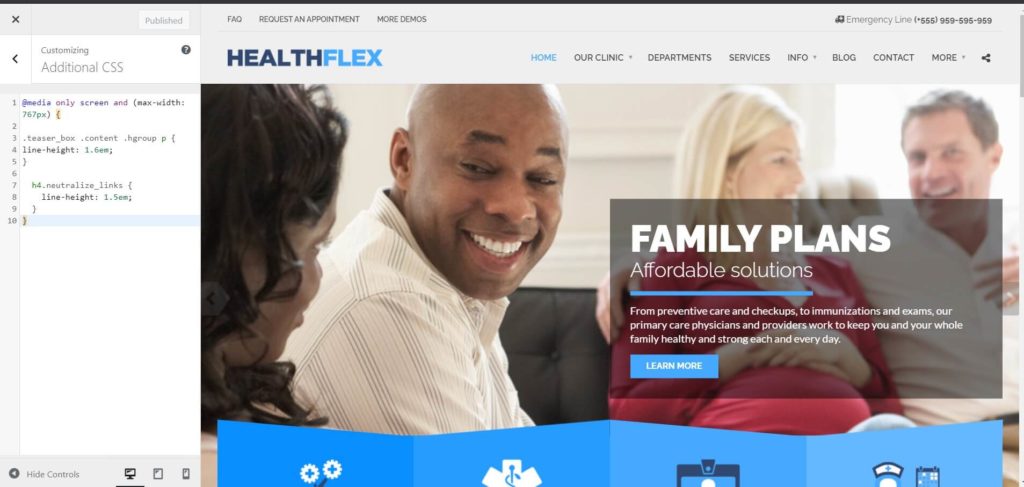
This is the recommended way for most users. WordPress has a special location where you can add your custom CSS code. You only need to log in to Dashboard and navigate to Appearance > Customizer > Additional CSS. The location is also available on the front-end if you have allowed the Toolbar to show up on the viewing site. This option is available per user, so, if you need to change it just go to Dashboard > Users and then edit your profile.

The Customizer offers a simple yet well-rounded interface for everyone who needs to easily customize a WordPress site. It spreads the screen into two parts allowing for “live” reviewing the changes you make. The three small “screen” icons on the bottom allow switching between responsive states too. When you are ready just click on Publish and the changes will pass through the public site. If you close the tab without publishing, the changes will be aborted (although a notice will appear the next time you go there, reminding you that you have some “unfinished business” there).
Add Custom CSS on the child theme.
The child theme is an original concept of WordPress. It is somehow “a ghost instance” of the theme you have currently activated on the site. By default, it’s only a couple of files that contain information about the original theme, yet, in the process, you can add a lot more. The good news is that a child theme allows for changing or adding code to the theme without actually touching the original files. To add your custom CSS you only need to edit the style.css file that is located on /wp-content/themes/theme-name/. WordPress will use the code on the child theme instead of the original. This way you can do your tricks without creating a mess.
Add Custom CSS using the theme’s options
This method may vary depending on the theme. Although WordPress encourages the theme authors to use the Additional CSS field on the Customizer for adding custom CSS, many themes contain a special field for this use. In most cases, the field is located on the theme options, on a dedicated section where the users can not only add CSS but also Javascript code, tracking snippets, etc. This can be convenient for the developer who can keep the code in one place. Obviously, the code you add on any of those fields will not work if you switch to another theme.
Add Custom CSS using a third party plugin
A simple search on the repository brings up several plugins for this use. This solution is very useful if you need to add Custom CSS which will be maintained even if you switch between themes; like when you are working on two children based on the same parent theme. If you are adding CSS rules for third-party elements (like plugins, not originally supported by the theme you have activated on the site) then, you can safely add your code there. Additionally, some plugins of this kind support multisite control which can be convenient for larger projects. Last but not least, adding Custom CSS this way allows for easily enabling or disabling the effects by merely activating or deactivating the plugin on the site.
Add Custom CSS directly (!) on the files of the theme
This method is for experienced developers only. Someone who can organize a working environment, and has full control of the workflow can go faster by deploying directly on the original style sheet. Usually, this person maintains the project using an external service (git) in order to have greater control over the installation.
Again, changing the original files of a theme will make an update much more complicated and we don’t recommend doing that. In fact, all the changes you make to the files will be overwritten by the new files of the theme. As you can imagine, all the work you have done will be lost. Therefore only developers who are using a theme as a base to build their own can use this method. And – notably – they will be maintaining all the code by themselves.
Extra: if you are using WPBakery Page Builder
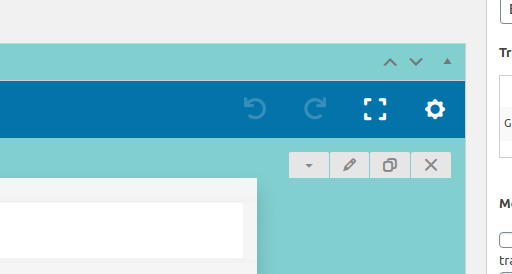
The particular plugin has a special location on each page to add custom CSS. This is super-convenient if you need to add a special style to a single post or page without using the page-id. The location is on the Backend Editor of WPBakery Page builder. Just edit the post and click on the top right of the editor, on the gear icon and a new box will come up allowing for entering your custom CSS.

When you’re done entering the code, don’t forget to click on Save changes and then Update the page to let the new style apply.
Similarly, you can find a corresponding location for adding custom CSS in almost every other page builder.
Wait! Test before you go
Because CSS is a language that does not produce any error messages, it is not always easy to check the results. You need to review the browser’s inspector every time you make a change, to ensure your new style is working. In some cases, even the location of a rule (lower or higher on the sheet) can cancel its effect. A missing bracket can and will create confusion. Furthermore, your code may work on some screen sizes but not on others. Not to mention browsers. Therefore, when it comes to additional styling, testing your code on every possible computing platform and browser is of great importance.
Thankfully, you don’t need to have a stack of devices to test your code. You can use an online service like Smartbear CrossBrowser Testing that allows for live testing of a webpage on a variety of operating systems and browsers. With Smartbear CrossBrowser Testing you can safely test and add custom CSS to any WordPress site.
Do you enjoy how CSS works? Do you want to improve your skills? Here are some great sources for CSS on the web:


Add Comment