Have you ever needed to create a complex contact form?
One where the visitor can access different queries depending on conditions? In this simple tutorial, we’ll demonstrate a way to create conditional fields in contact forms using the popular plugin Contact Form 7.
The Scenario
You have a product, and you need to showcase its features per demand:
- it has two different sizes and colors.
- you need to let the visitor decide which variation likes most and get an email in our inbox
A form can be used as:
- a marketing strategy since we get data directly from our visitors.
- a direct sales mechanism since we can even get an order from the customer this way.
We will need to have a WordPress site and install the Contact Form 7 and Conditional Fields plugins.
After installing the plugins, add a new contact form and check the configuration.
Contact forms have been evolved from simple communication tools to everyday marketing platforms. On Plethora Themes we include Contact Form 7 to the recommended plugins in every theme. Ιt’s the most simple and at the same time, flexible Contact Form system available on WordPress. The plugin is been authored and maintained by Takayuki Miyoshi.
The Basics
The use of Contact Form 7 is based on Tag Names. Using the tag generator tools, add some tags which will be displayed in the contact form. The syntax is very simple. You can find all the syntax rules here https://contactform7.com/tag-syntax/
Let’s use a small example. Assuming we need to create a contact form where the visitor is asked to select between two sizes of t-shirts and a number of available colors. We have
- a small form type t-shirt and a medium form type t-shirt.
- for small t-shirt type, we have three colors: black, blue and red.
- for medium t-shirt type, we have another three colors: black, white and green.
We provide the visitor with two size options and three color options.
Deploying
First of all, let’s add a new Contact Form and give it a title.
By default, each new form has these basic options enabled: name, email, subject, message, and the submit button. We can remove the Subject as we don’t need it. The asterisk next to each tag type means the field is required.
We need to add three new tags and two groups.
Tags are:
- Color will become the input for the Size
- SmallColors will become the input for the colors of the small size t-shirt type
- MediumColors will become the input for the colors of the medium size t-shirt type
Groups are:
- The group SmallSizeColors will be the one handle for the condition and
- The group MediumSizeColors will be the other handle
The syntax is simple: we set the tags and, add the groups, one after the other. We make sure the critical tag is before the groups, therefore, we can create the conditional rules. The form is going to look like this:
<label> Your Name (required)
[text* your-name] </label>

<label> Your Email (required)
[email* your-email] </label>

<label> Select Size (required)</label>
[checkbox* Size exclusive "Small" "Medium"]

[group SmallSizeColors]
<label> Select Color </label>
[select SmallColors "Black" "Blue" "Red"]
[/group]

[group MediumSizeColors]
<label> Select Color </label>
[select MediumColors "Black" "White" "Green"]
[/group]

<label> Leave a message
[textarea your-message] </label>

[submit "Send"]
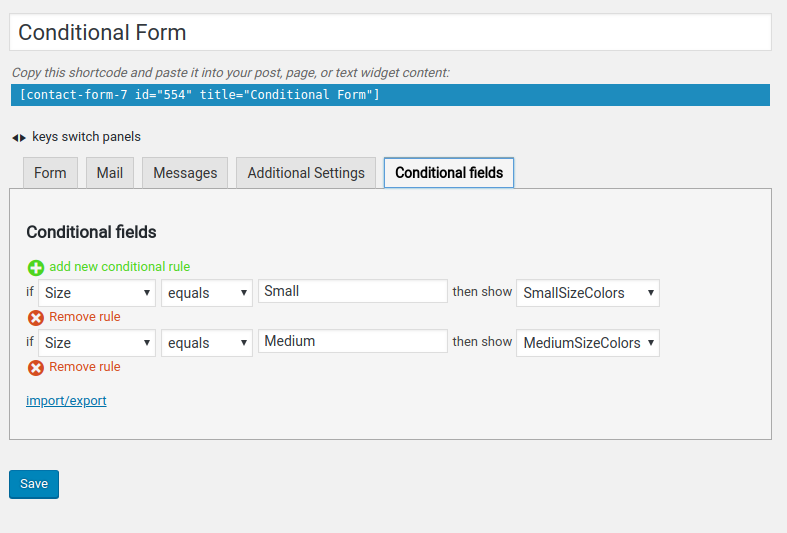
Note that SmallColors and MediumColors (the inputs for the colors) are inside each corresponding group. Those colors will only appear if the visitor selects the appropriate size. After saving the form, let’s add the additional logic. We need to go to the Conditional Fields tab and create the rules according to our plan. It will look like this:

We’ve set these rules to make the form display a different group for each size. Now, let’s configure the email. We need to include all possible tags; the form will display those who follow the conditional rules
From: [your-name] <[your-email]>

Hello pal! I'm interested in this variation

[Size]

[SmallColors]

[MediumColors]

Comments:
[your-message]

---
This form has been sent from the conditional form of my website!
Although the groups will become available as tags on the Mail, we don’t need to not include any of them. Instead, we must use only those tags who actually contain options. In addition, the plugin will include only the selected/used ones, leaving leave an empty space in the place where unused tags are
The form is now ready, and we can copy the shortcode and paste it on any page of our website. This is a just small example of how conditional logic can be used with Contact Form 7. With a little work, you can produce a lot more complex forms to get the best out of your surveys.


Add Comment